Friday, February 26, 2010

Control your camera by voice


Now this is fun. Did you know that every Mac comes with built-in speech recognition? Since all Apple laptops and the iMac come with a built in microphone you only need to know how to use AppleScript to voice control your camera using a Zephir or an Arduino I/O board.

You find the control panel under System Preferences- Speech. At first click on Calibrate ... to set the levels and train the system.


The following AppleScript listens for an hour for one of three keywords and starts or stops video or shoots a photo on one of the new Canon EOS DSLRs while you're hands are free to do other things. See previous posts for details on the Zephir.


tell application "ZephIR" to activate --get ZephIR ready
delay 2
tell application "System Events" to set visible of process "ZephIR" to false --hide ZephIR

repeat
try
tell application "SpeechRecognitionServer"
set command to listen for {"shoot photo", "shoot video", "exit"} giving up after 3600 --seconds
end tell
on error
display alert "Listening session timed out. Start script again."
return
end try

if command is "shoot video" then
tell application "ZephIR" to fire zephir command "START-STOP VIDEO" of component "Canon RC-1"
beep
else if command is "shoot photo" then
tell application "ZephIR" to fire zephir command "SHOOT PHOTO" of component "Canon RC-1"
else if command is "exit" then
delay 1
say "Good bye"
return
end if
end repeat


You can also demand a keyword (e.g. okay) before each command like okay shoot video, okay shoot photo and okay exit.

Tuesday, February 23, 2010

Controlling the Canon EOS Utility using AppleScript

The Canon EOS Utility is a great piece of software especially when you consider that it comes free with every Canon EOS DSLR. Its Remote Live View shooting window gives you a decent monitor image and lets you even start and stop video recording on all cameras that have the EOS Movie function.


The EOS Utility is not directly accessible using AppleScript but you still can control it using GUI scripting. The AppleScript below e.g. clicks on the "Prepare the camera for movie recording" button at the lower left corner of the Remote Live View window.

To find the pixel coordinates of a button press SHIFT COMMAND 4 on the keyboard. This activates the screenshot utility and if you place the cursor over a button you can see its pixels coordinates. Note the numbers and press ESC.

You must "Enable access for assistive devices" in System Preferences > Universal Access in order to use the scripts below.

Tested with OS X 10.4 and 10.5 only:
tell application "EOS Utility" to activate
tell application "System Events"
tell process "EOS Utility"
click at {38, 700} --x,y screen coordinates. 0,0 is at the upper left corner.
end tell
end tell


When you run this AppleScript (with the button coordinates of your screen!) you will notice the line
checkbox 1 of window "Remote Live View window" of application process "EOS Utility" of application "System Events"

in the "Result" area at the bottom of the Script Editor window. This is the actual AppleScript reference to this button that can be used in an AppleScript that is now independent of the window size of the EOS Utility.

tell application "EOS Utility" to activate
tell application "System Events"
tell process "EOS Utility"
click checkbox 1 of window "Remote Live View window" of application process "EOS Utility" of application "System Events"
end tell
end tell

Or just for fun the entire script in two command lines
tell application "EOS Utility" to activate
tell application "System Events" to tell process "EOS Utility" to click checkbox 1 of window "Remote Live View window" of application process "EOS Utility" of application "System Events"

The following script allows timed recordings:

on enable()
tell application "EOS Utility" to activate
tell application "System Events"
tell process "EOS Utility"
click checkbox 1 of window "Remote Live View window" of application process "EOS Utility" of application "System Events"
end tell
end tell
delay 1
end enable

on rec()
tell application "EOS Utility" to activate
tell application "System Events"
tell process "EOS Utility"
click checkbox 2 of window "Remote Live View window" of application process "EOS Utility" of application "System Events"
end tell
end tell
delay 2
end rec

enable()
rec()
delay 10 --record for 10 seconds
rec()
enable()


The next example clicks repeatedly on the <<< and >>> Focus buttons to simulate a focus pull from the background to the foreground and back again. It's not very smooth and repeatable though.


on enable()
tell application "EOS Utility" to activate
tell application "System Events"
tell process "EOS Utility"
click checkbox 1 of window "Remote Live View window" of application process "EOS Utility" of application "System Events"
end tell
end tell
delay 1
end enable

on rec()
tell application "EOS Utility" to activate
tell application "System Events"
tell process "EOS Utility"
click checkbox 2 of window "Remote Live View window" of application process "EOS Utility" of application "System Events"
end tell
end tell
delay 2
end rec

on focusNear3()
tell application "EOS Utility" to activate
tell application "System Events"
tell process "EOS Utility"
click button 8 of group 1 of window "Remote Live View window" of application process "EOS Utility" of application "System Events"
end tell
end tell
end focusNear3

on focusFar3()
tell application "EOS Utility" to activate
tell application "System Events"
tell process "EOS Utility"
click button 9 of group 1 of window "Remote Live View window" of application process "EOS Utility" of application "System Events"
end tell
end tell
end focusFar3

enable()
rec()
delay 3
repeat 4 times
focusFar3()
end repeat
delay 3
repeat 4 times
focusNear3()
end repeat
delay 3
rec()
enable()


Before you ask, yes I've tried to start movie recording and QuickTime audio recording at the same time via AppleScript. It works but it's impossible to get video and audio synced automatically. The delays are too long.

Sunday, February 21, 2010

Recording EOS movies with synced external audio -
A more dependable way

Requires an Arduino I/O board plus 180 ohms resistor and IR LED, an Apple computer with QuickTime Pro and an USB bus powered audio interface with phantom powered microphone inputs.

Calling the Zephir application from AppleScript (see previous post) added an unwanted delay. This solution is better since it uses the Arduino as an IR transmitter again. The response is much faster and both the QuickTime audio recording and the EOS movie recording stop at the same time. Occasionally there is a one frame inaccuracy but most of the time synchronisation is spot on if the track ends are aligned.


The AppleScript works like in the previous post but only has to send a character over the serial connection to the Arduino to start video recording. You need the free AppleScript extension SerialPort X to make it work.

(*
Simultanuously start and stop EOS movie and QuickTime audio recording.
EOS movie recording starts with a delay after receiving the remote signal but it stops at the same time as the audio recording.
To sync video and external audio align the track ends.
Requires an Arduino I/O board (arduino.cc) plus 180 ohms resistor and IR LED, an Apple computer with QuickTime Pro and an USB bus powered audio interface with phantom powered microphone inputs.
2010, Martin Koch, controlyourcamera.blogspot.com
*)
on countdown()
say "three"
delay 1
say "two"
delay 1
say "one"
delay 1
say "action"
end countdown

-- Uses SerialPort X from http://mysite.verizon.net/vzenuoqe/MacSoft.html
set portRef to serialport open "/dev/cu.usbserial-A6004byf" bps rate 9600 data bits 8 parity 0 stop bits 1 handshake 0
delay 2
if portRef is equal to -1 then
display dialog "Could not open serial port" buttons {"Cancel"} default button 1

else

tell application "QuickTime Player"
activate --get QuickTime Player ready
new audio recording --prepare new audio recording
end tell

tell application "Script Editor"
activate
display dialog "Start recording?" with title "EOS movie + QuickTime audio" buttons {"Cancel", "START"} default button 2
end tell

countdown()

serialport write "R" to portRef -- Write to Arduino to send EOS movie start/stop signal
tell application "QuickTime Player" to start first recording
beep

tell application "Script Editor" to display dialog "Stop recording?" with title "EOS movie + QuickTime audio" buttons {"STOP"} default button 1

serialport write "R" to portRef -- Write to Arduino to send EOS movie start/stop signal
tell application "QuickTime Player"
stop first recording
close first document
end tell

serialport close portRef

end if


The Arduino sketch continuously monitors the serial connection to the computer and sends the movie recording start signal if it receives the character R.

/*
Arduino sketch for simulating a Canon RC-1 remote control
Huge thanks go to http://www.doc-diy.net/photo/rc-1_hacked/index.php for figuring out the Canon RC-1 IR code.
2010, Martin Koch, http://controlyourcamera.blogspot.com
*/
#define irLED_EOS 11 // connect a IR LED with a 180 ohms resistor in series to digital pin 11
byte inbyte = 0;

void setup() {
pinMode(irLED_EOS, OUTPUT);
Serial.begin(9600); //open the serial port
}

void loop() {
inbyte = Serial.read();
if (inbyte == 'R') EOS_REC();
}


void EOS_REC() {
for(int count=0; count<16; count++) { //Burst 1
digitalWrite(irLED_EOS, HIGH);
delayMicroseconds(11);
digitalWrite(irLED_EOS, LOW);
delayMicroseconds(11);
}

delayMicroseconds(5360); //Pause

for(int count=0; count<16; count++) { //Burst 2
digitalWrite(irLED_EOS, HIGH);
delayMicroseconds(11);
digitalWrite(irLED_EOS, LOW);
delayMicroseconds(11);
}
return;
}

Wednesday, February 17, 2010

Recording EOS movies with synced external audio - The simple way

I found a very convenient way to get high quality synced audio. I tried this some time ago with my Canon 5D Mark II but gave up because I couldn’t get the external audio synched to the movie files. Now that I know that the 5D Mark II takes some time to actually start recording (when triggered via remote) I tried it again with success.

All that’s needed is a Zephir universal remote control, an Apple computer with QuickTime Pro and an USB bus powered audio interface with phantom powered microphone input(s) like e.g. the Alesis io|2 or a Shure X2U or a Centrance MicPort Pro.

To get the Canon RC-1 remote for the Zephir click on WebztIR in the Zephir application and navigate to Canon - Camera - Remote_RC_1. To make it compatible with the Applescript below rename the rather long video starting command to "START-STOP VIDEO".


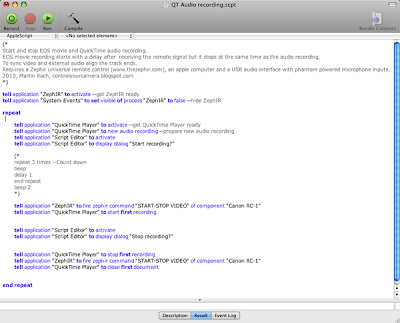
Starting and stopping audio and video recording is done by AppleScript. Copy and paste the script below into the Script Editor and press the green run button. Note that there's no guarantee for the accuracy of AppleScripts delay command.


(*
Start and stop EOS movie and QuickTime audio recording.
EOS movie recording starts with a delay after receiving the remote signal but it stops at the same time as the audio recording.
To sync video and external audio align the track ends.
Requires a Zephir universal remote control (thezephir.com), an Apple computer with QuickTime Pro and an USB bus powered audio interface with phantom powered microphone inputs.
2010, Martin Koch, controlyourcamera.blogspot.com
*)

tell application "ZephIR" to activate --get ZephIR ready
tell application "System Events" to set visible of process "ZephIR" to false --hide ZephIR

tell application "QuickTime Player" to activate --get QuickTime Player ready
tell application "QuickTime Player" to new audio recording --prepare new audio recording

tell application "Script Editor" to activate
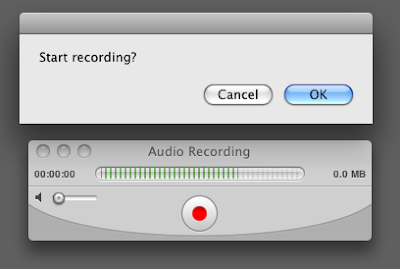
tell application "Script Editor" to display dialog "Recording" buttons {"Cancel", "START"}

say "three"
delay 1
say "two"
delay 1
say "one"
delay 1
say "action"
beep

tell application "ZephIR" to fire zephir command "START-STOP VIDEO" of component "Canon RC-1"
tell application "QuickTime Player" to start first recording

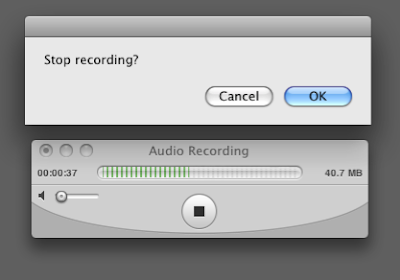
tell application "Script Editor" to display dialog "Recording ..." buttons {"STOP"}

ignoring application responses --don't wait until the Zephir action has finished
tell application "ZephIR" to fire zephir command "START-STOP VIDEO" of component "Canon RC-1"
end ignoring
delay 0.33 --alter this delay until the EOS movie and QuickTime recording end at the same time.
tell application "QuickTime Player" to stop first recording
tell application "QuickTime Player" to close first document


The AppleScript starts movie recording with the help of the Zephir universal remote control and uses the QuickTime Player to record an audio file at the same time.


The audio files are automatically saved at a location that can be determined with QuickTime Player > Preferences… - Recording. They are automatically named Audio.mov, Audio 1.mov, Audio 2.mov and so on. With the 5D Mark II file numbering set to “Auto reset” paired file naming can be achieved so finding the corresponding audio files is easy.


All that’s needed to sync the audio tracks is to align the track ends. AppleScript doesn't guarantee exact timing but I found that the synchronisation accuracy most of the time was high and repeatable.

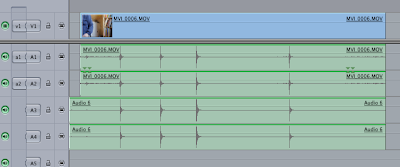
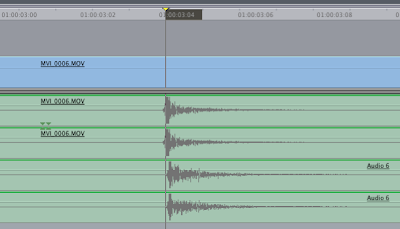
I run the script without delay first and measured 10 frames difference between the audio spikes. At a frame rate of 30 fps one frame equals 1/30 = 0.033 seconds so since the external audio was 10 frames earlier a 0.33 s delay did the syncronisation.


The screenshot above shows the timeline zoomed in to a one frame level. As you can see the offset is really low and not audible. But since AppleScripts timing is not dependable such a synchronisation accuracy is not always the case.

If the audio sync is not perfect select the video track and press the . or , key to move the track by one frame until the audio waveforms line up.

Monday, February 15, 2010

Recording EOS movies with synced external audio

As long as you don’t film fine detail which causes heavy aliasing the current Canon DSLRs with EOS movie function record stunning images. The biggest flaw though is the audio automatic gain control (AGC) of those cameras. Whenever a scene is quiet the AGC pumps up the amplification of the microphone signal resulting in quite noticable noise hiss.

One solution to get high quality audio is to record it externally and sync the video and audio files later in the video editor. This means you have to start video and audio recording by pushing buttons on two different devices. It’s a hassle and you better not forget to turn on audio recording.
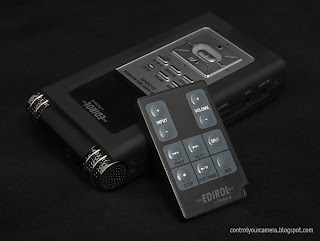

The Edirol R-09HR audio recorder has good internal microphones and records up to 24 bit/96 kHz audio. It also has 1/8” jack inputs for an external mic or line signal. But the best thing is that it comes with an infrared remote control.
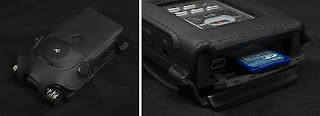

An optional leather cover offers a 1/4" mounting thread. I removed the back to get to the SD card more easily.
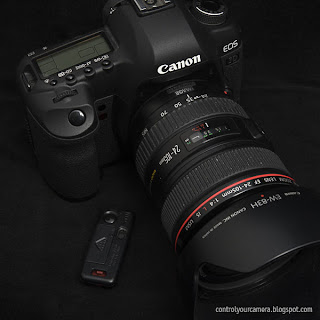

All current Canon DSLRs with EOS movie function allow starting and stopping video recording via an optional infrared remote control. Just switch the camera into Live View and use the 2s delay setting on the Canon RC-1 remote to start and stop video recording.


This project uses an Arduino I/O board and two IR LEDs to start recording on the Edirol R-09HR audio recorder and the camera at the same time.


You can find the corresponding files with the help of the recording date but once you convert the h.264 files to lets say ProRes 422 files you’re altering the file date. A foolproof way is to set the cameras file numbering to “Auto reset” and the R-09HR audio recorder file naming to “Name”. This makes sure that file numbering starts with one on every blank storage card. Unfortunately the Canon EOS DSLRs do not differentiate between movie files and photo files so if you shoot photos make sure you also record a short audio file to keep file numbering paired.


Although both devices receive the IR signal at practically the same time (with just a few milliseconds delay) the EOS movie recording starts with a quite long delay. Fortunately both stop recording at the same time so syncing is easy. All that’s needed to sync the audio tracks with one frame accuracy is to align the track ends.

Is the synchronisation accurate enough? Since the R-09HR STOP signal takes about 73 milliseconds and the EOS REC signal takes just about 6 milliseconds it makes sense to send the shorter signal at last i.e. the movie recording stops about 6 milliseconds later than the audio recording. To put this into perspective lets look at the approximate frame duration of video files. 24 or 25 fps equal roughly 40 milliseconds per frame and 30 fps equals about 33 milliseconds per frame. The 6 millisecond delay is therefore well within frame accuracy. You will hear the external sound within the same frame even when it comes 6 milliseconds before the audio recorded in the camera.
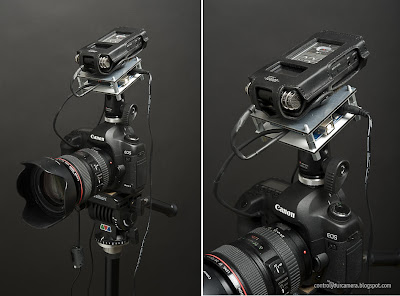


It looks weird but it gives me EOS movies with synced 24 bit/96 kHz audio.

Does this setup produce good sound? Not really, the internal microphones of the R-09HR are omnidirectional and pick up sound from everywhere. You usually want to capture the sound of the scene you're filming by placing a directional microphone close to the action. So for best sound connect an external directional microphone.
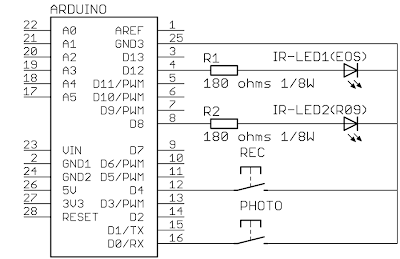


The circuit.


The Arduino sketch

/*
Arduino sketch for simulating a Canon RC-1 and EDIROL R-09HR IR remote control
2010, Martin Koch
http://controlyourcamera.blogspot.com/
Huge thanks go to http://www.doc-diy.net/photo/rc-1_hacked/index.php for figuring out the Canon RC-1 IR code.
IR signal sending code is based on an example at http://luckylarry.co.uk/2009/07/arduino-ir-remote-intervalometer-for-nikon-d80-that-means-timelapse-photography-yarrr
*/
#define irLED_EOS 12 // connect a IR LED with a 180 ohms resistor in series to digital pin 12
#define irLED_R09 8 // connect a IR LED with a 180 ohms resistor in series to digital pin 8
#define statusLED 13 // Built in LED on Arduino board
#define recBUTTON 4 // connect a push button to digital pin 4 and GND
#define photoBUTTON 0 // connect a push button to digital pin 0 and GND
boolean rec = true;

void setup() {
pinMode(irLED_EOS, OUTPUT);
pinMode(irLED_R09, OUTPUT);
pinMode(statusLED, OUTPUT);
pinMode(recBUTTON, INPUT);
pinMode(photoBUTTON, INPUT);
digitalWrite(recBUTTON, HIGH); //turn on internal 20 k pullup resistor so the open input state is HIGH
digitalWrite(photoBUTTON, HIGH); //turn on internal 20 k pullup resistor so the open input state is HIGH
}

void loop() {
if (digitalRead(recBUTTON) == LOW) {
if (rec) {
digitalWrite(statusLED, HIGH);
R09_REC(); // Activate
delay(1000);
EOS_REC();
R09_REC();
rec = false;
delay(1000); // ignore button contact bouncing
}
else {
R09_STOP();
EOS_REC();
digitalWrite(statusLED, LOW);
rec = true;
delay(1000); // ignore button contact bouncing
}
}

if (digitalRead(photoBUTTON) == LOW) {
digitalWrite(statusLED, HIGH);
EOS_PHOTO();
delay(2000); // allow camera to write photo to card
}
}

void EOS_REC() {
for(int count=0; count<16; count++) { //Burst 1
digitalWrite(irLED_EOS, HIGH);
delayMicroseconds(11);
digitalWrite(irLED_EOS, LOW);
delayMicroseconds(11);
}

delayMicroseconds(5360); //Pause

for(int count=0; count<16; count++) { //Burst 2
digitalWrite(irLED_EOS, HIGH);
delayMicroseconds(11);
digitalWrite(irLED_EOS, LOW);
delayMicroseconds(11);
}
return;
}

void EOS_PHOTO() {
for(int count=0; count<16; count++) { //Burst 1
digitalWrite(irLED_EOS, HIGH);
delayMicroseconds(11);
digitalWrite(irLED_EOS, LOW);
delayMicroseconds(11);
}

delayMicroseconds(7330); //Pause

for(int count=0; count<16; count++) { //Burst 2
digitalWrite(irLED_EOS, HIGH);
delayMicroseconds(11);
digitalWrite(irLED_EOS, LOW);
delayMicroseconds(11);
}
return;
}

void R09_REC() {
unsigned long IR_Signal[68] = {
690,690,44,44,44,130,44,44,44,44,44,44,44,44,44,44,44,130,44,44,44,130,44,130,44,44,44,130,44,130,44,130,44,130,44,130,44,130,44,44,44,130,44,44,44,130,44,44,44,44,44,44,44,44,44,130,44,44,44,130,44,44,44,130,44,130,44,0 };
for (int i=0; i<68; i=i+2) {
unsigned long endBurst = micros() + IR_Signal[i] * 13;
while(micros() < endBurst) {
digitalWrite(irLED_R09, HIGH);
delayMicroseconds(13);
digitalWrite(irLED_R09, LOW);
delayMicroseconds(13);
}
unsigned long endPause = micros() + IR_Signal[i+1] * 13;
while(micros() < endPause);
}
}

void R09_STOP() {
unsigned long IR_Signal[68] = {
690,690,44,44,44,130,44,44,44,44,44,44,44,44,44,44,44,130,44,44,44,130,44,130,44,44,44,130,44,130,44,130,44,130,44,130,44,44,44,44,44,130,44,44,44,130,44,44,44,44,44,44,44,130,44,130,44,44,44,130,44,44,44,130,44,130,44,0 };
for (int i=0; i<68; i=i+2) {
unsigned long endBurst = micros() + IR_Signal[i] * 13;
while(micros() < endBurst) {
digitalWrite(irLED_R09, HIGH);
delayMicroseconds(13);
digitalWrite(irLED_R09, LOW);
delayMicroseconds(13);
}
unsigned long endPause = micros() + IR_Signal[i+1] * 13;
while(micros() < endPause);
}
}

Saturday, February 13, 2010

Finding out IR signal timing using a Zephir

Thanks to John Sims from TheZephir.com I recently learned an easy way to find out infrared signal timings for use with lets say an Arduino application.

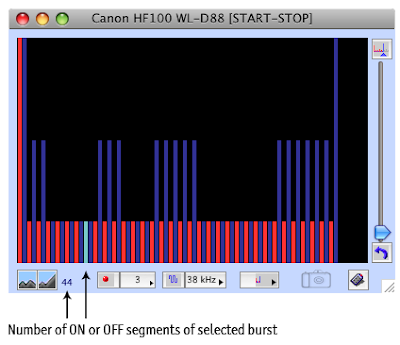
The screenshot below shows the START-STOP signal of a Canon HF100 camcorder in the Zephir signal editor. The editor offers a graphical representation of the IR signal. Red bars are ON bursts where the IR LED is switched on and off repeatedly 38000 times per second. Blue bars represent pauses. The height of the bars is proportional to the length of each burst or pause.


If you select a bar the number of ON or OFF segments is shown in the lower left corner. The example above shows 44 segments. Since each cycle consists of two segments (one ON and one OFF state) the number of cycles repeating at 38 kHz is 22. To find out an entire burst length or pause length multiply the number of cycles with 26 microseconds, the length of a 38 kHz cycle. (1 / 38000 = 0.000026 seconds) e.g. 22 cycles times 26 microseconds equals 572 microseconds burst length.

Now comes the fun part. In the Zephir editor choose Edit > Select All followed by Edit > Copy. To get the number of cycles of each bar just copy the clipboard content into a text editor:
684,351,044,130,044,130,044,044,044,044,044,044,044,044,044,044,044,130,044,130,044,130,044,044,044,044,044,044,044,130,044,130,044,130,044,130,044,130,044,044,044,044,044,044,044,044,044,044,044,044,044,044,044,044,044,130,044,130,044,130,044,130,044,130,044,130,044,3116


Below is an example how this can be used in an Arduino sketch. Note that all "044" numbers have been replaced with "44".

/*
Arduino sketch for sending a START-STOP IR remote signal to a Canon HF100 camcorder
Code is based on an example at http://luckylarry.co.uk/2009/07/arduino-ir-remote-intervalometer-for-nikon-d80-that-means-timelapse-photography-yarrr
2010, Martin Koch, http://controlyourcamera.blogspot.com
*/
#define irLED 3
unsigned long START_STOP_Signal[68] = {684,351,44,130,44,130,44,44,44,44,44,44,44,44,44,44,44,130,44,130,44,130,44,44,44,44,44,44,44,130,44,130,44,130,44,130,44,130,44,44,44,44,44,44,44,44,44,44,44,44,44,44,44,44,44,130,44,130,44,130,44,130,44,130,44,130,44,3116};

void setup() {
pinMode(irLED, OUTPUT);
START_STOP();
delay(3000); // record 3 * 1000 ms
START_STOP();
}

void loop() {
}

void START_STOP() {
for (int i=0; i<68; i=i+2) {
unsigned long endBurst = micros() + START_STOP_Signal[i] * 13; // create the microseconds to pulse for
while(micros() < endBurst) {
digitalWrite(irLED, HIGH); // turn IR on
delayMicroseconds(13); // half the clock cycle for 38 Khz (26.32×10⁻⁶s)
digitalWrite(irLED, LOW); // turn IR off
delayMicroseconds(13); // delay for the other half of the cycle to generate oscillation
}
unsigned long endPause = micros() + START_STOP_Signal[i+1] * 13; // create the microseconds to delay for
while(micros() < endPause);
}
}